


Have you been hearing a lot about NFTs lately? Maybe your friends are talking about digital art selling for millions, or you saw someone make a killer profit flipping one on OpenSea. And now, you’re thinking you can also do it. The good news is that minting your first NFT isn’t as scary as it sounds. Let’s break it down.
What Does ‘Minting’ Even Mean?
Before we dive in, let’s get one thing straight. Minting an NFT is basically turning your digital file – could be art, music, a video clip, whatever – into a token on the blockchain. Think of it as giving your digital creation a certificate of authenticity and making it publicly tradable.
It’s kind of like signing your name on a painting, but way more techy. And yes, once it’s minted, it lives on the blockchain forever. No take-backs.
Step 1: Pick Your Blockchain
Here’s the deal: Not all blockchains are created equal when it comes to NFTs. The most popular one is Ethereum. Everyone’s familiar with it, and most marketplaces support it. But here’s the catch: gas fees can be insane sometimes. Like, you might spend $50–$100 just to mint a single NFT.
If that sounds painful, you could go for alternatives like Solana, Polygon, or Tezos. They’re way cheaper, and the transaction times are faster. Sure, Ethereum has the prestige factor. But if you’re just experimenting, why pay an arm and a leg?
Step 2: Set Up a Crypto Wallet
You need a wallet. Period. This is where your NFTs and cryptocurrency live. Think MetaMask, Phantom, or Coinbase Wallet. MetaMask is the most common for Ethereum-based NFTs.
Setting it up is surprisingly easy: download the app, create a new wallet, and don’t forget to write down your seed phrase. Seriously. Don’t skip that part. Lose your seed phrase, and you lose everything. There’s no “password reset” on the blockchain.
Once your wallet’s ready, you’ll need to fund it with some crypto. Usually, that means ETH if you’re on Ethereum. Don’t go crazy – just enough to cover minting and transaction fees.
Step 3: Choose Your Marketplace
Now comes the fun part: picking where to mint. OpenSea is the most popular for beginners. Super user-friendly. There’s also Rarible, Mintable, and a bunch of niche marketplaces. Each one has pros and cons, so maybe poke around a bit.
Here’s something to think about: some marketplaces let you mint for “free” via lazy minting. That means the NFT isn’t actually created until someone buys it, so you don’t pay upfront gas fees. Handy if you’re hesitant about spending crypto before making a sale.
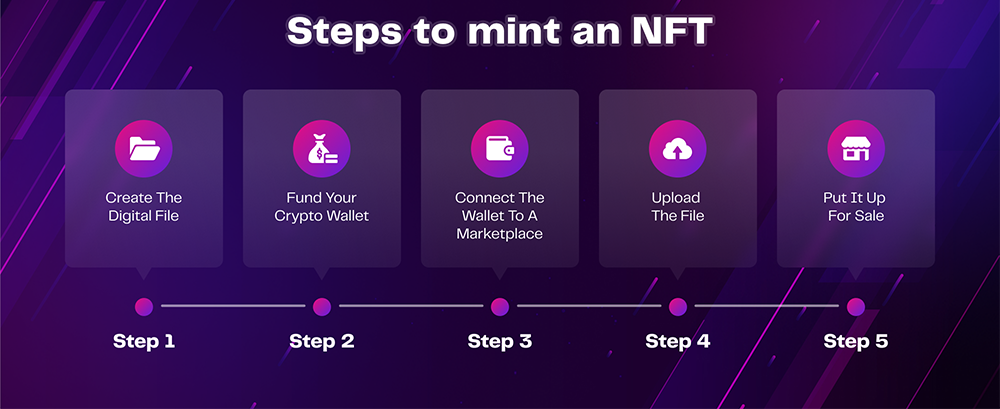
Step 4: Create Your NFT
Alright, time to make your NFT. Usually, the platform will ask you to upload your file, give it a title, and add a description. Here’s where creativity counts.
Think of your title and description as your NFT’s first impression. A few sentences explaining the story behind the artwork, or why it’s special, can make a big difference. Buyers love knowing the story. It’s like art in a gallery; context matters.
You can also set properties, like traits or unlockable content. Some creators include extra goodies, like high-res files or behind-the-scenes videos, accessible only to the buyer. It’s a cool little touch that adds value.
Step 5: Mint It
Now comes the moment of truth: minting. Hit that button, confirm your transaction in your wallet, and… wait. On Ethereum, it might take a few minutes. On cheaper chains, it’s almost instant.
Once done, congrats! You officially own a minted NFT. Well, technically, your wallet does, but you get the idea. You’ve just entered the blockchain world. Feels good, right?
Step 6: Listing and Selling (Optional)
If you’re minting just for fun, you can stop here. But most people want to sell. Listing your NFT is usually straightforward: set a fixed price or put it up for auction. The fixed price is simple. Auction… well, it’s a gamble, but can sometimes pay off big.
Pro tip: don’t expect to become an overnight millionaire. NFTs are volatile. Sometimes they sell fast. Other times, your NFT might sit there for months. Patience is key. And marketing helps. Post on socials, join Discord groups, or even make a little teaser video. Basically, tell people why your NFT is worth checking out.
Step 7: Be Ready for Taxes
Here’s the thing: crypto isn’t magic money. Most countries consider selling NFTs a taxable event. Keep records of your purchases, minting fees, and sales. You’ll thank yourself later. Nobody likes a surprise tax bill.
Some Extra Tips Before You Dive In
- Start small – Mint one NFT first. Don’t throw your whole crypto stash into it.
- Think about the future – NFTs can include royalties, meaning you earn a percentage every time someone resells your NFT. Pretty sweet passive income if it catches on.
- Experiment with different formats – GIFs, short videos, 3D art, music tracks—NFTs aren’t just for static images.
- Join the community – Discord and Twitter are where NFT culture thrives. You’ll learn a lot, get feedback, and maybe even find collaborators.
Wrapping It Up
Let’s be honest: minting an NFT can feel intimidating at first. Gas fees, wallets, marketplaces – it’s a lot to digest. But the steps themselves aren’t rocket science. Pick a blockchain, set up a wallet, choose a marketplace, upload your creation, hit mint, and you’re done.
The blockchain world moves fast. Some NFT projects blow up overnight; others fizzle out. But that’s the beauty of it – you get to play, experiment, and maybe even make some money along the way.
Here’s the real takeaway: it’s not just about selling. It’s about ownership, creativity, and joining a new digital economy. Your first NFT is your entry ticket. What you do after that is up to you.
So, go on. Pick that file you’ve been tinkering with, set up your wallet, and take the plunge. Minting your first NFT is kind of like planting a seed. Who knows? It might just grow into something huge.